Install LAMP Stack (Linux, Apache, MySQL, PHP) with PHPMyAdmin on Ubuntu 20.04 Server
LAMP Stack (Linux, Apache, MySQL, PHP) with PHPMyAdmin on Ubuntu 20.04

A “LAMP” stack is a group of open source software that is typically installed together in order to enable a server to host dynamic websites and web apps written in PHP. This term is an acronym which represents the Linux operating system, with the Apache web server. The site data is stored in a MySQL database, and dynamic content is processed by PHP.
In this guide, you’ll set up a LAMP stack on an Ubuntu 20.04 server.
Type the following command to find OS name and version:
# cat /etc/*rel*

check my youtube video "Install LAMP Stack with PHPMyAdmin on Ubuntu 20.04 Server" for your reference.
Apache:
You will need to have root user access. So, open the terminal and login to the server as the root user.
# sudo su -
Now perform the update using APT.
# apt update
Apache is one of the most widely used web server and to install it we need to run the following command.
# apt install apache2 net-tools -y

Once we have Apache installed, we need to create Apache conf file only for Domain HOST.
# cd /etc/apache2/sites-available/
Create and paste below mentioned details in conf file.
# vim meetdarji.conf
<VirtualHost *:80>
ServerName meetdarji.com
DocumentRoot /var/www/html/meetdarji.com
ErrorLog ${APACHE_LOG_DIR}/meetdarji.error.log
CustomLog ${APACHE_LOG_DIR}/meetdarji.log combined
<Directory /var/www/html/meetdarji.com>
Options Indexes FollowSymLinks MultiViews
AllowOverride All
Require all granted
</Directory>
</VirtualHost>
Save and exit using ':wq!', Now create HTML file for website front page.
# cd /var/www/html/
# mkdir meetdarji.com
# cd meetdarji.com
# vim index.html
<html>
<head>
<title>
Meet Darji
</title>
<style>
body {
text-align: center;
}
h1 {
color: green;
}
</style>
</head>
<body>
<h1>Meet Darji</h1>
<h2>
Please Like Share and Subscribe
</h2>
<p>
<b>https://www.youtube.com/c/meetdarji</b>
</p>
</body>
</html>
If you want to disable the default Apache page, we need to run the following commands.
# a2dissite 000-default.conf
# a2dissite default-ssl.conf
Now Enable meetdarji.conf file of Use the following command.
# a2ensite meetdarji.conf

Before restarting the Apache2 service, Check your configuration is correct or not using the "apache2ctl -t" command and restart the apache2 service.
# apache2ctl -t
# systemctl restart apache2

Checking 80 Port is enabled and running.
# netstat -ntlp | grep -i 80
Once all is done, test by accessing your server’s IP or Domain name in your browser:

Apache Configuration is Working...😀
Mysql:
On Ubuntu 20.04, you can install MySQL using the APT package repository. At the time of this writing, the version of MySQL available in the default Ubuntu repository is version 8.0.27.
Install the required package:
# apt install mysql-server -y
Once installed, Start and enable mysql service:
# systemctl start mysql.service
# systemctl enable mysql.service
# systemctl status mysql.service

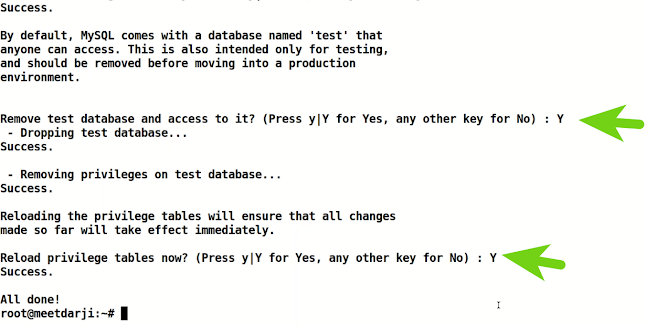
Secure your newly installed Mysql service by creating a ROOT password using the following steps:
# mysql_secure_installation


Now login in MySQL with Root user:
# mysql -u root -p

# exit
It's Working...😀
PHPmyadmin:
phpMyAdmin is a web-based tool written in PHP to manage the MySQL database. Apart from viewing the tables (and other db objects), you can perform lot of DBA functions through the web based interface. You can also execute any SQL query from the UI.
Run the following command to install PHP and PHPMyAdmin:
# apt install phpmyadmin php-mbstring php-zip php-gd php-json php-curl -y

Just Enter on OK using TAB:

# php -v

After installing all packages, Add the PhPMyAdmin file in Apache.conf for access PHPMyAdmin:
# vim /etc/apache2/apache2.conf
Include /etc/phpmyadmin/apache.conf

Restart Apache for the changes to take effect:
# systemctl restart apache2now set root password for MySQL PHPMyAdmin authentication:
# mysql -u root -p
ALTER USER 'root'@'localhost' IDENTIFIED WITH mysql_native_password BY 'meetdarji';
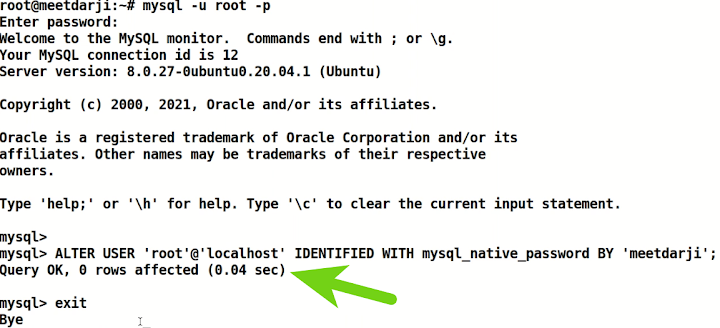
# exit

Lastly, I hope it's helpful. So, let me know your suggestions and feedback using the comment section.

check my youtube video "Install LAMP Stack with PHPMyAdmin on Ubuntu 20.04 Server" for your reference.
Tags:
How to Install the LAMP Stack on Ubuntu 18.04
How to Install the LAMP Stack on Ubuntu 20.04
How to Install the LAMP Stack on Linux
How To Install Linux, Apache, MySQL, PHP (LAMP) stack on Ubuntu
LAMP Applications
Install LAMP Stack (Linux, Apache, MySQL, PHP) in Ubuntu
How to Install an Apache LAMP Server on Ubuntu 20.04
How to install and run Apache web server in Ubuntu Linux
How to Install Apache 2 on Ubuntu 20.04
How to Install Apache on Linux - Ubuntu
How to Install MySQL on Ubuntu
How to Install MySQL on Ubuntu 20.04 LTS
phpmyadmin install ubuntu
Install phpMyAdmin On Ubuntu 20.04
How to install phpMyAdmin on Ubuntu
How to Install LAMP server and PHPMyAdmin on Ubuntu
How To Install Phpmyadmin With Apache Lamp On Ubuntu


Comments
Post a Comment