Create a free EC2 Linux instance in AWS For 12 Months
Create a free EC2 Linux instance in AWS For 12 Months

- Follow the steps in Setting up with Amazon EC2 in the Amazon EC2 User Guide for Linux Instances to create a key pair. If you already have a key pair, you don't need to create a new one. You can use your existing key pair for this exercise.
check my youtube video "Create a Free EC2 Linux Instance In AWS" for your reference.
1. Open the Amazon EC2 console at https://console.aws.amazon.com/ec2
2. Choose Launch Instance.


5. In Step 3: Configure Instance Details, provide the following information:
Leave Number of instances at one.
Leave Purchasing option at the default setting.
For Network, choose the entry for the same VPC that you noted when you created your EFS file system in Step 1: Create your Amazon EFS file system.
For Subnet, choose a default subnet in any Availability Zone.
For File systems, make sure that the EFS file system that you created in Step 1: Create your Amazon EFS file system is selected. The path shown next to the file system ID is the mount point that the EC2 instance will use, which you can change.
The User data automatically includes the commands for mounting your Amazon EFS file system.

- Choose Next: Add Storage.

- Choose Next: Add Tags.

- Name your instance and choose Next: Configure Security Group.
You can't access your EC2 instance by Secure Shell (SSH) using this security group. SSH access isn't required for this exercise. To add access by SSH later, you can edit the default security and add a rule to allow SSH. Or you can create a new security group that allows SSH. You can use the following settings to add SSH access:
Type: SSH
Protocol: TCP
Port Range: 22
- Source: Anywhere 0.0.0.0/0

- Choose Review and Launch.
2.
Select the check box for the key pair that you created, and then choose Launch Instances.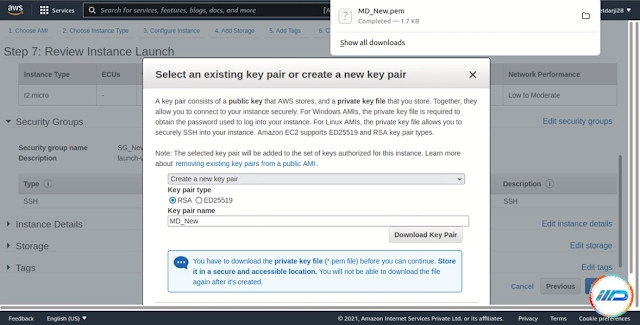


Comments
Post a Comment